Getting Started
Welcome to the Templix documentation! This comprehensive guide will walk you through everything you need to know to get started with Templix, manage your content, and deploy your template marketplace.
Prerequisites
Before you begin, make sure you have the following installed on your system:
- Node.js (version 20.0 or higher) - Download here
- npm or pnpm - Package manager (npm comes with Node.js)
- Git - Version control system
- A code editor (we recommend VS Code)
Installation
Follow these steps to set up Templix on your local machine:
-
Clone the Repository
git clone https://github.com/yourusername/templix.git cd templix -
Install Dependencies
npm installThis will install all required packages including Astro, React, Keystatic, and other dependencies.
-
Start the Development Server
npm run devYour site will be available at
http://localhost:4321 -
Access the Admin Panel
Navigate to
http://localhost:4321/keystaticto access the Keystatic CMS admin interface.
Project Structure
Understanding the project structure will help you navigate and customize Templix:
templix/
├── src/
│   ├── assets/           # Images and static assets
│   │   └── images/       # Organized by content type
│   ├── components/       # Reusable Astro & React components
│   ├── content/          # CMS-managed content
│   │   ├── templates/    # Template listings
│   │   ├── pages/        # Static pages
│   │   └── settings/     # Global settings
│   ├── layouts/          # Page layouts
│   ├── pages/            # Route pages (file-based routing)
│   └── styles/           # Global CSS
├── keystatic.config.ts   # CMS configuration
└── astro.config.mjs      # Astro configuration
Content Management
Templix uses Keystatic CMS to provide a user-friendly interface for managing all your content without writing code.
Accessing the CMS
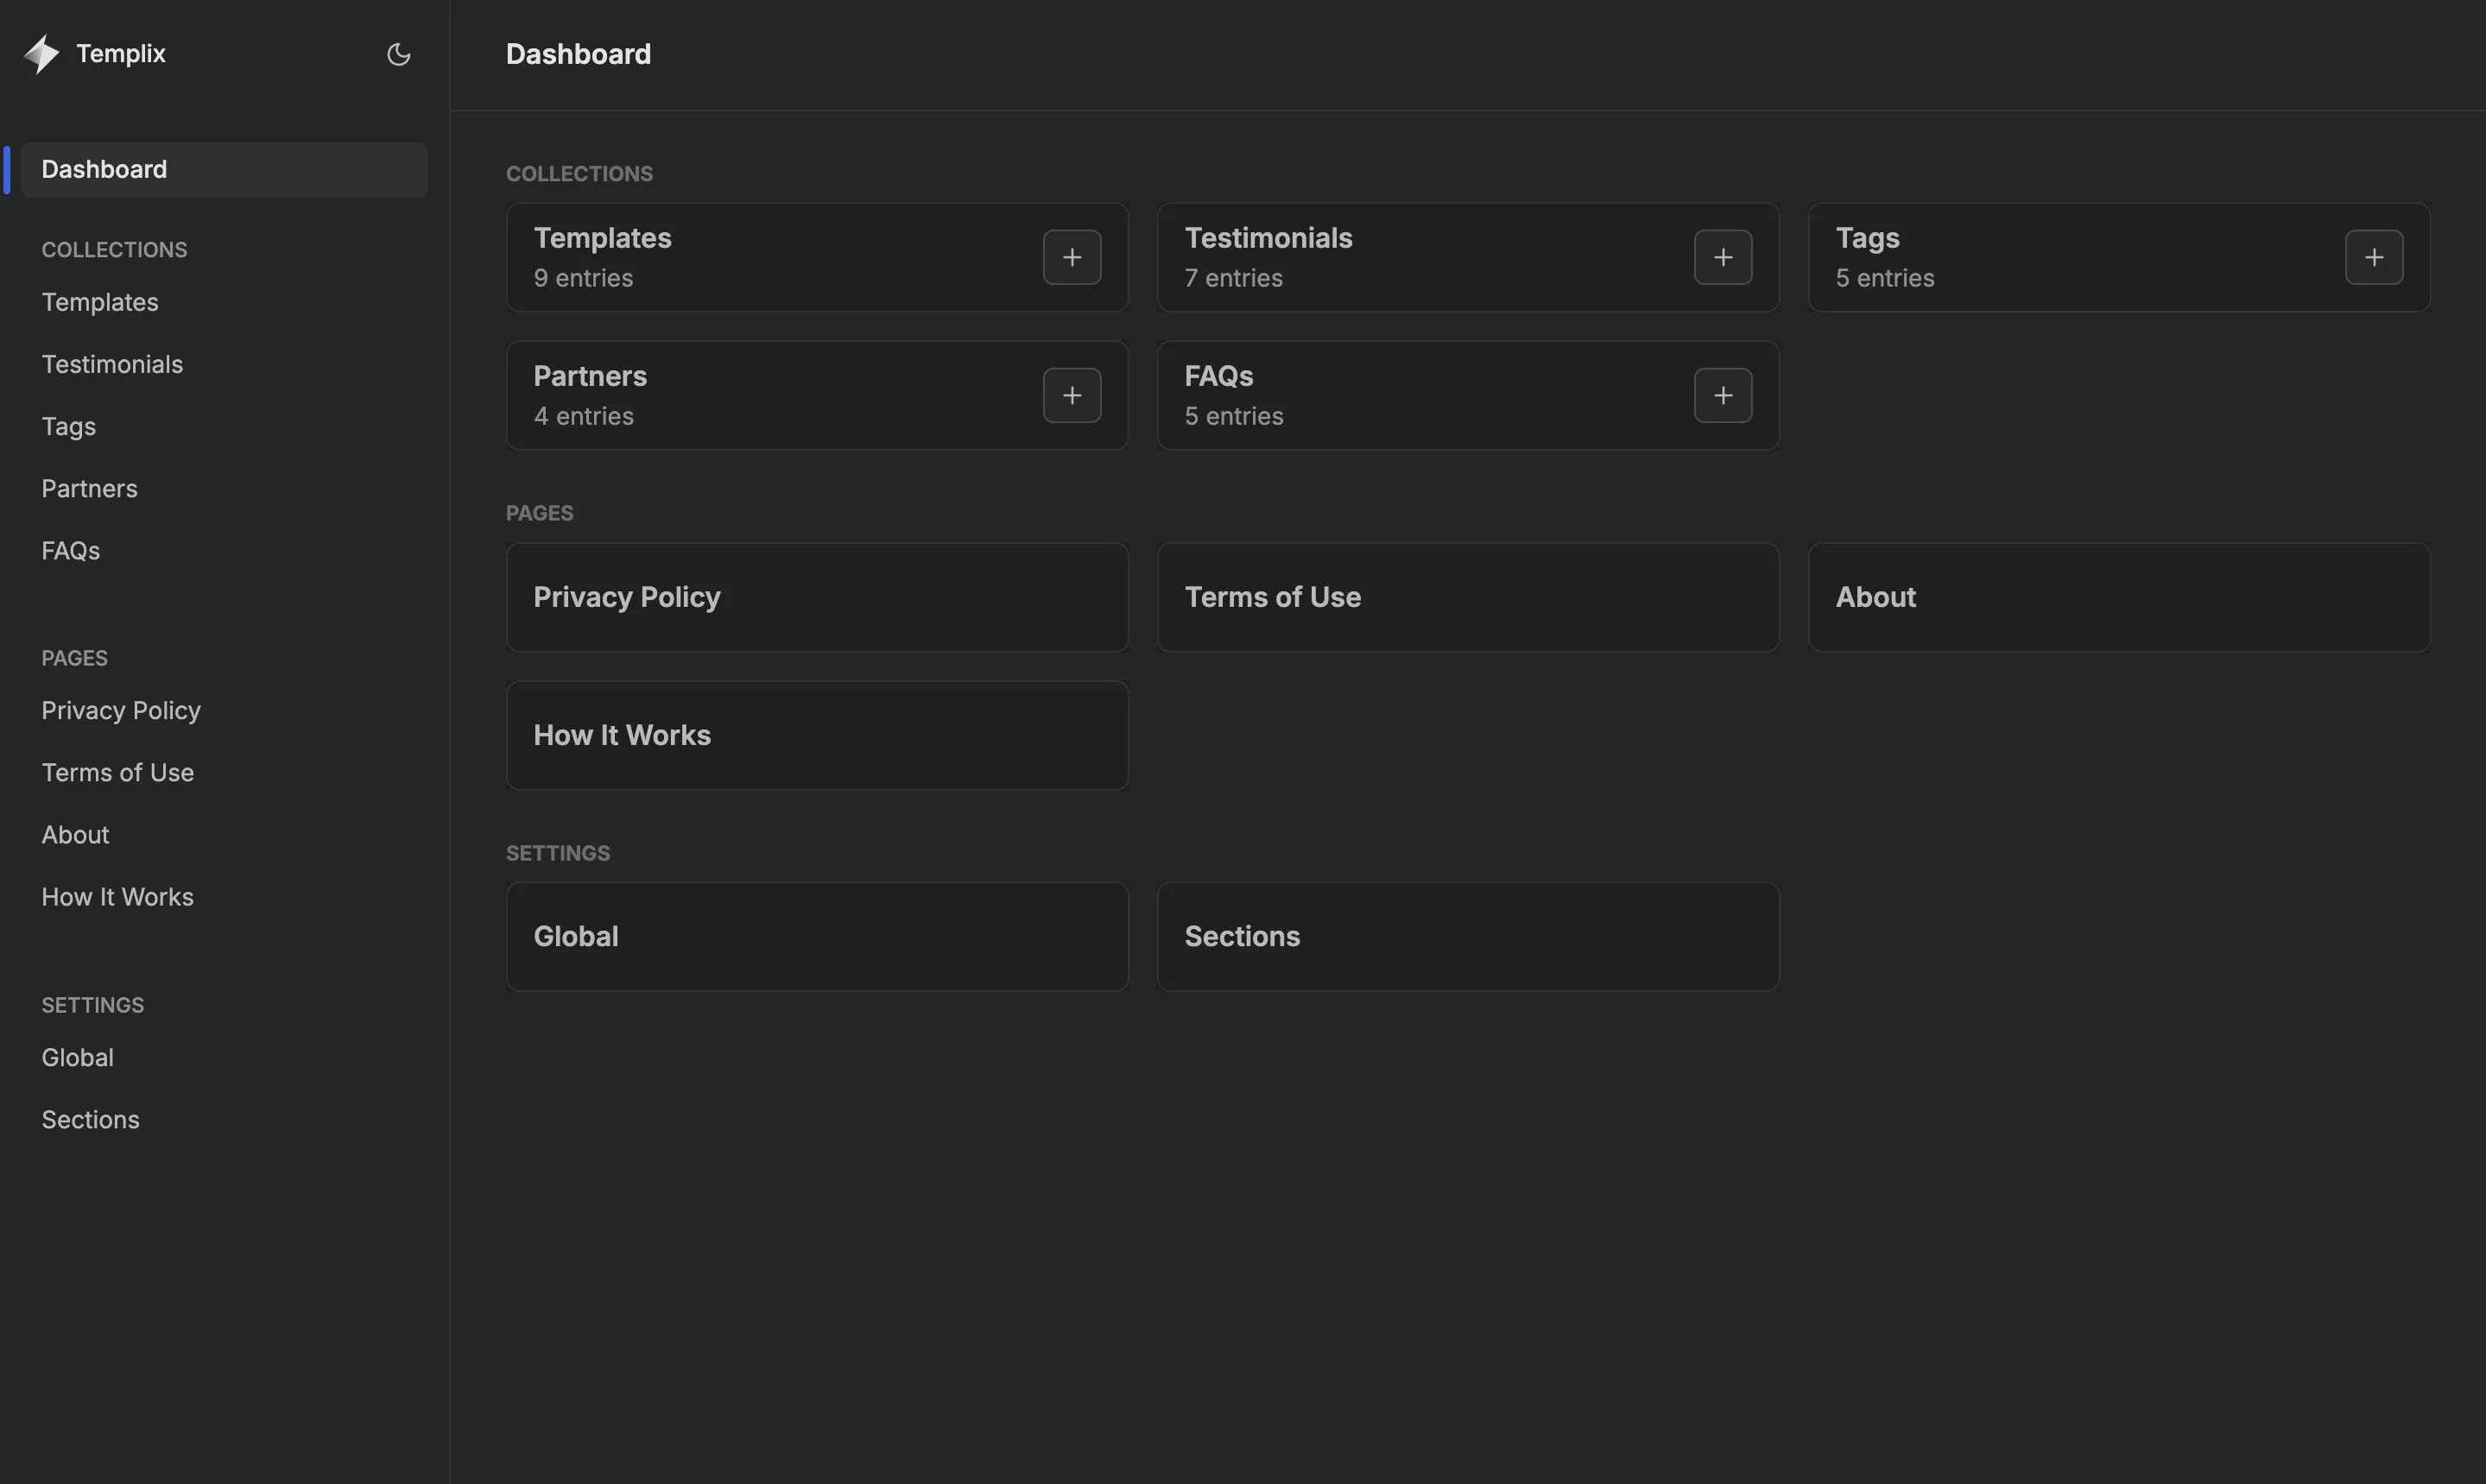
The Keystatic admin panel is available at /keystatic when running the development server. From here, you can:
- Create and edit templates
- Manage testimonials
- Update FAQs
- Configure global settings
- Edit page content
Creating a New Template
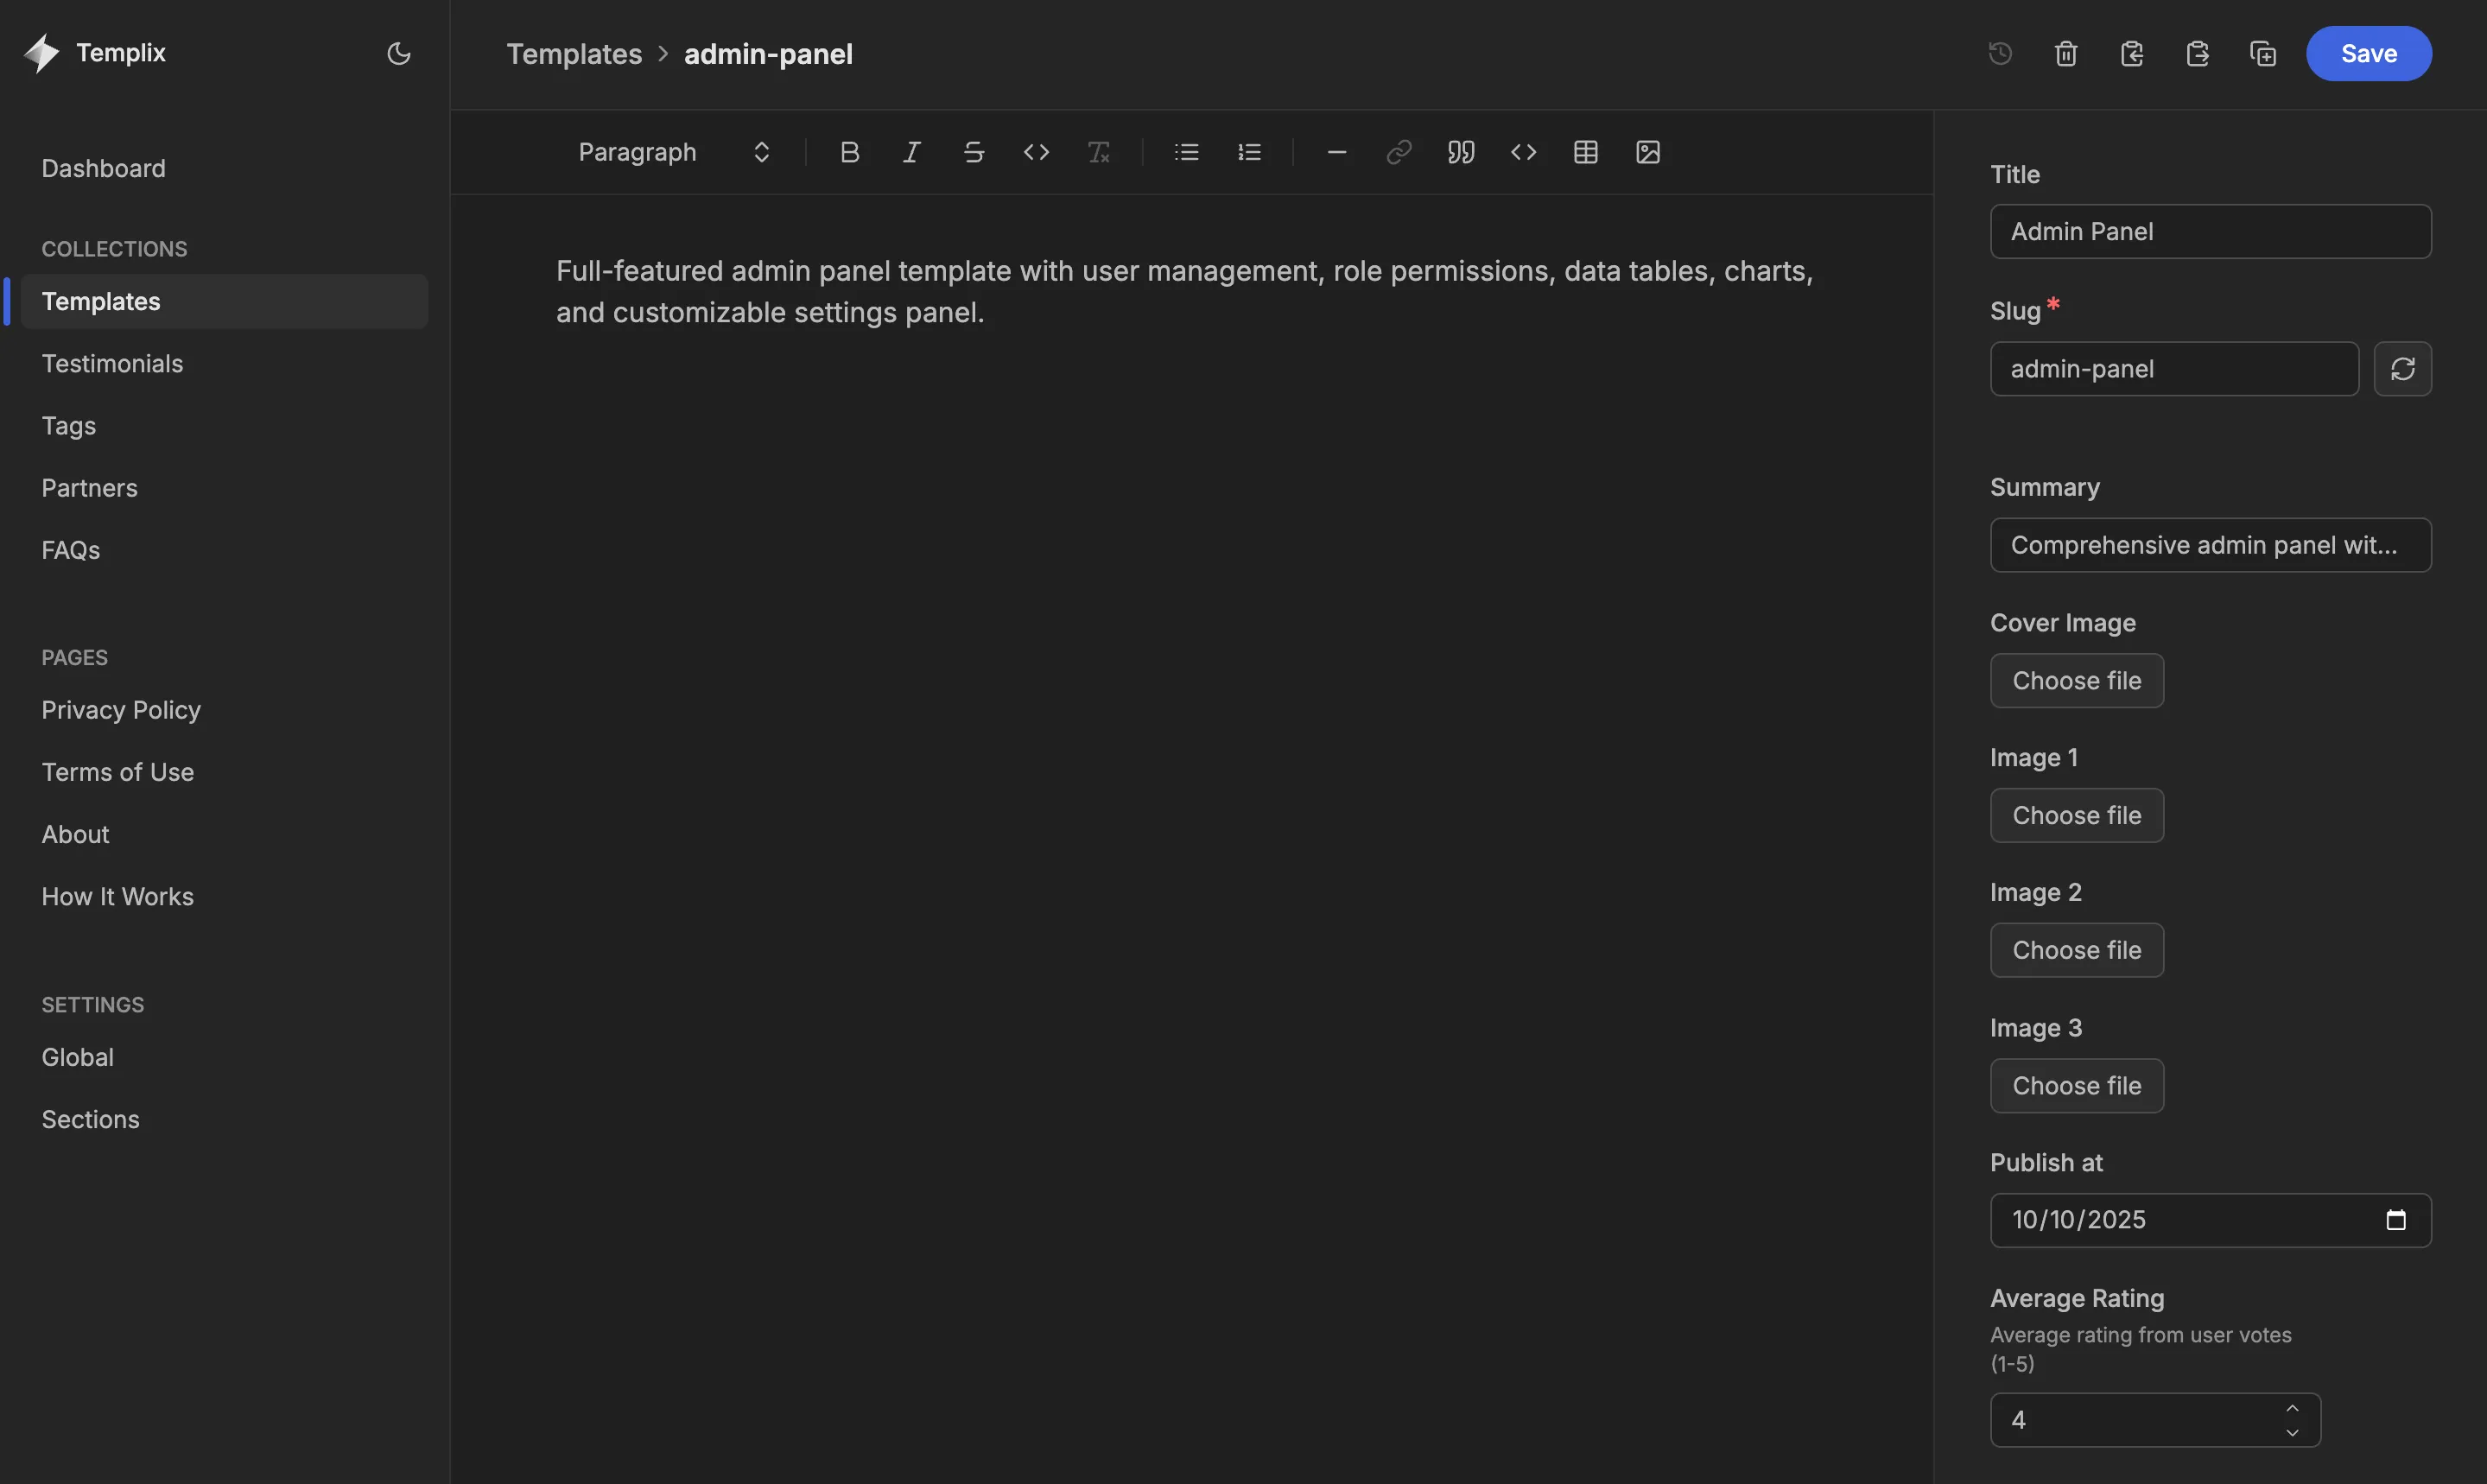
To add a new template to your marketplace:
- Navigate to
/keystaticin your browser - Click on “Templates” in the Collections section
- Click the “Create Template” button
- Fill in the template details:
- Title: The name of your template
- Summary: A brief description (appears in cards)
- Content: Detailed description using Markdoc
- Cover Image: Main preview image
- Additional Images: Up to 3 extra screenshots
- Price: Price in cents (e.g., 2900 = $29.00)
- Links: Purchase, download, preview, and source URLs
- Tags: Categorize your template
- Rating: Average rating and vote count
- Click “Save” to publish the template
Managing Collections
Templix includes several content collections:
Templates
Product listings with rich descriptions, pricing, and media. Each template includes:
- Detailed Markdoc content with formatting
- Multiple images for showcasing
- Pricing and purchase information
- Ratings and reviews
- Tag-based categorization
Testimonials
Customer reviews and feedback displayed on your homepage:
- Author name
- Quote/review text
- Optional avatar image
Partners
Logo showcase for trusted brands:
- Partner name
- Light mode logo (SVG recommended)
- Dark mode logo (SVG recommended)
- Website URL
FAQs
Frequently asked questions to help your customers:
- Question text
- Answer text
Tags
Categorization system for templates:
- Tag name (used for filtering)
Editing Page Content
Static pages like About, Privacy Policy, and Terms of Use can be edited through the Pages section:
- Navigate to Pages in Keystatic
- Select the page you want to edit
- Update the title, content, or last updated date
- Save your changes
The content uses Markdoc format, which supports:
- Headings (H2, H3, H4)
- Bold and italic text
- Lists (ordered and unordered)
- Links
- Code blocks
- Images
Global Settings
Configure site-wide settings in the Settings section:
Branding
- Logo for light and dark themes
- Website name
- SEO description
Navigation
- Main menu links (header and footer)
- Social network profiles
- Extra footer links
Formatting
- Currency (USD, BRL, EUR)
- Date format (short, medium, long)
Homepage Sections
- Hero background and overlay style
- Hero title and description
- Call-to-action buttons
- Section headings and subtitles
- Promotion banner settings
Keystatic Modes
Keystatic supports several storage modes. Templix ships configured for GitHub mode, because that is what lets you edit content from the deployed site. You can switch to local mode in a single line if you prefer to edit only on your own machine.
GitHub Mode (the shipped default)
Best for: editing from the live site, teams, and any workflow where you are not always at your development machine.
How It Works
- Content lives in your GitHub repository as
.mdoc,.mdand.yamlfiles - You sign in to
/keystaticwith GitHub, and Keystatic commits on your behalf - Changes can go straight to a branch or through a pull request
- The admin works on your deployed site, not only on localhost
Because this is the shipped default, keystatic.config.ts reads REPO_OWNER and REPO_NAME and throws if they are missing — including in local development. Set them before your first npm run dev.
Setup Steps
-
Create the GitHub App
Keystatic authenticates through a GitHub App, not a classic OAuth App. The easiest route is to let Keystatic create it for you: run
npm run dev, openhttp://localhost:4321/keystatic, and follow the setup prompt. It registers the app and prints the values for the next step.To create it by hand instead, go to GitHub → Settings → Developer settings → GitHub Apps → New GitHub App and set the callback URL described below.
-
Set the callback URLs
The callback path is
/api/keystatic/github/oauth/callback. Note the order of the segments —/keystatic/api/...will not work.A GitHub App accepts several callback URLs, so add one per environment you use:
http://127.0.0.1:4321/api/keystatic/github/oauth/callback
https://your-site.example/api/keystatic/github/oauth/callback
Keystatic builds the
redirect_urifrom the origin of the incoming request. Every hostname you open the admin on needs its own entry, including a*.workers.devURL you still use alongside a custom domain. A missing entry producesredirect_uri_mismatchfrom GitHub after you sign in. -
Set the environment variables
REPO_OWNER=your-github-username REPO_NAME=your-repository-name KEYSTATIC_GITHUB_CLIENT_ID=your_app_client_id KEYSTATIC_GITHUB_CLIENT_SECRET=your_app_client_secret KEYSTATIC_SECRET=a_long_random_string PUBLIC_KEYSTATIC_GITHUB_APP_SLUG=your-github-app-slugKEYSTATIC_SECRETsigns the session cookie — generate it withopenssl rand -hex 32and keep it stable, or everyone is signed out whenever it changes. -
Know which variables are needed when
This trips people up on the first deploy:
Variable Needed at Where it goes on Cloudflare REPO_OWNER,REPO_NAMEBuild time — inlined into the bundle Build environment variables PUBLIC_KEYSTATIC_GITHUB_APP_SLUGBuild time — it is public by design Build environment variables KEYSTATIC_GITHUB_CLIENT_IDRuntime Worker variable, or varsinwrangler.jsoncKEYSTATIC_GITHUB_CLIENT_SECRETRuntime npx wrangler secret putKEYSTATIC_SECRETRuntime npx wrangler secret putA build-time variable that is only set as a runtime secret will silently produce a broken build, and a runtime variable that is only set at build time will fail at sign-in.
Note that
wrangler deployreplaces the Worker’s plain variables with whateverwrangler.jsoncdeclares. Templix sets"keep_vars": trueso that variables you configured in the Cloudflare dashboard survive a deploy. Secrets are never touched by a deploy. -
Access the admin
Navigate to
https://your-site.example/keystaticand sign in with GitHub.
Adding a Custom Domain Later
When you move the site to a custom domain, the admin starts sending a redirect_uri on the new hostname, which GitHub rejects until you allow it. Two steps:
- Add
https://your-new-domain.example/api/keystatic/github/oauth/callbackto the GitHub App’s callback URLs. Keep the old one if that URL still serves the site. - Rebuild and redeploy, so the build-time variables above are baked in against the new domain.
Nothing in keystatic.config.ts needs to change — the redirect URL is derived from the request, not from configuration.
Workflow
- Navigate to the admin panel and authenticate with GitHub
- Make content changes in the UI
- Keystatic commits to a branch, or opens a pull request
- Review and merge on GitHub
- The site rebuilds with the new content
Learn More
See the official Keystatic GitHub mode documentation.
Local Mode
Best for: solo development, offline work, and testing before you set up a GitHub App.
How It Works
- Keystatic writes directly to the files in
src/content/on your machine - No GitHub App, no authentication, no environment variables
- The admin is only available while
npm run devis running
Advantages
- ✅ No external accounts or credentials needed
- ✅ Full version control with Git, on your own terms
- ✅ Works completely offline
- ✅ Nothing to configure
Trade-off
The admin does not work on the deployed site. Content changes happen on your machine and reach production through a commit and a rebuild.
Switching to Local Mode
Replace the storage block in keystatic.config.ts:
export default config({
  storage: {
    kind: "local",
  },
  // ... other configuration
});
You can then delete the REPO_OWNER / REPO_NAME guard at the top of that file, since nothing reads them any more.
Cloud Mode
Best for: Non-technical editors, simple workflows, and Keystatic Cloud users
Keystatic Cloud provides a hosted CMS solution where content is stored on Keystatic’s servers and synced to your repository.
How It Works
- Content is stored in Keystatic Cloud
- Synced to your GitHub repository automatically
- Web-based admin panel hosted by Keystatic
- Authentication managed by Keystatic
Advantages
- ✅ Easiest setup for non-technical users
- ✅ Managed authentication and hosting
- ✅ Automatic content sync
- ✅ No infrastructure to maintain
- ✅ Edit from anywhere with internet
Setup Steps
-
Sign Up for Keystatic Cloud
Visit keystatic.com and create an account.
-
Connect Your Repository
- Link your GitHub account
- Select your Templix repository
- Grant necessary permissions
-
Update Keystatic Configuration
In
keystatic.config.ts:export default config({ storage: { kind: "cloud", }, cloud: { project: "your-project-id", }, // ... other configuration }); -
Deploy Your Site
Deploy to your hosting provider with the updated configuration.
-
Access the Admin
Use the Keystatic Cloud dashboard to manage your content.
Workflow
- Log in to Keystatic Cloud dashboard
- Select your Templix project
- Make content changes in the web UI
- Changes automatically sync to GitHub
- Your hosting provider rebuilds the site
- Updates go live
Pricing
Keystatic Cloud offers various pricing tiers. Visit keystatic.com/pricing for current plans and features.
Learn More
For detailed setup instructions, visit the official Keystatic Cloud documentation.
Customization
Styling and Themes
Templix uses Tailwind CSS v4 and DaisyUI for styling. The design is built with semantic colors that automatically adapt to light and dark modes.
Customizing Colors
Edit src/styles/global.css to modify the theme:
@import "tailwindcss";
@plugin "daisyui" {
  themes: light --default, dark --prefersdark;
}
You can customize DaisyUI themes or add your own theme variants. See the DaisyUI themes documentation for details.
Adding Custom Components
Create new components in src/components/:
- Create a new
.astroor.tsxfile - Import and use it in your pages
- Follow the mobile-first, theme-safe patterns
Modifying Layouts
Layouts are located in src/layouts/:
- BaseLayout.astro: Base HTML structure and SEO meta tags
- SingletonLayout.astro: Article-style pages with optional table of contents
You can create new layouts by extending BaseLayout.astro.
Adding New Pages
Templix uses file-based routing. To add a new page:
- Create a new
.astrofile insrc/pages/ - The file name becomes the URL (e.g.,
contact.astro→/contact) - Use a layout and add your content
Example:
---
import BaseLayout from "../layouts/BaseLayout.astro";
---

<BaseLayout title="Contact" description="Get in touch">
  <div class="container mx-auto px-4 py-16">
    <h1>Contact Us</h1>
    <!-- Your content -->
  </div>
</BaseLayout>
Enabling TOC on Pages
Templix includes a responsive Table of Contents (TOC) sidebar that automatically generates navigation from your H2 and H3 headings. This feature is perfect for documentation pages, guides, or any long-form content.
How It Works
The TOC is powered by Astro’s render() function, which automatically extracts headings from your content at build time. The sidebar displays on desktop (xl+ screens) and features:
- Collapsible sections - H2 headings with H3 children can be collapsed/expanded
- Active state tracking - Highlights the current section as you scroll
- Smooth scrolling - Click any heading to smoothly scroll to that section
- Auto-expand - Collapsed sections automatically open when scrolled to
- Responsive - Hidden on mobile/tablet, visible as sticky sidebar on desktop
Enabling TOC on a Page
To enable the TOC on any page using SingletonLayout, follow these steps:
-
Extract headings from render()
When rendering your content, destructure the
headingsarray from therender()function:--- import SingletonLayout from "../layouts/SingletonLayout.astro"; import { getEntry, render } from "astro:content"; const entry = await getEntry("yourCollection", "your-slug"); if (!entry) { throw new Error("Entry not found"); } const { title, lastUpdated } = entry.data; // Extract both Content and headings const { Content, headings } = await render(entry); --- -
Pass headings to SingletonLayout
Add the
showToc={true}andheadings={headings}props to SingletonLayout:<SingletonLayout title={title} description="Your page description" lastUpdated={formattedDate} showToc={true} headings={headings} > <Content /> </SingletonLayout>
Complete Example
Here’s a complete example of a page with TOC enabled:
---
import SingletonLayout from "../layouts/SingletonLayout.astro";
import { getEntry, render } from "astro:content";
import { formatDate } from "../lib/templateHelpers";
import type { DateFormat } from "../lib/templateHelpers";

// Fetch the content entry
const documentation = await getEntry("pages", "documentation");

if (!documentation) {
  throw new Error("Documentation page not found");
}

const { title, lastUpdated } = documentation.data;

// Extract Content and headings from render()
const { Content, headings } = await render(documentation);

// Format the date
const settings = await getEntry("global", "global");
const dateFormat = (settings?.data.formatting?.dateFormat || "medium") as DateFormat;
const formattedDate = formatDate(lastUpdated, dateFormat);
---

<SingletonLayout
  title={title}
  description="Complete documentation for your project"
  lastUpdated={formattedDate}
  showToc={true}
  headings={headings}
>
  <Content />
</SingletonLayout>
Content Structure Tips
For the best TOC experience:
- Use H2 for main sections - These appear as top-level items in the TOC
- Use H3 for subsections - These appear nested under their parent H2
- Keep headings concise - Short, descriptive headings work best in the sidebar
- Avoid H1 in content - The page title is already an H1
- First 3 sections open by default - Later sections are collapsed to save space
Disabling TOC
To disable the TOC on a page, simply omit the showToc prop or set it to false:
<SingletonLayout
  title={title}
  description="Description"
>
  <Content />
</SingletonLayout>
The TOC will not appear, and the content will use the full width of the page.
[Screenshot: Page with TOC sidebar showing collapsible sections and active state]
Building and Deployment
Building for Production
Create an optimized production build:
npm run buildThis generates static files in the ./dist/ directory.
Preview Production Build
Test your production build locally:
npm run previewDeployment Options
Templix is configured for Cloudflare Workers deployment with hybrid rendering support. You can also deploy to other platforms by changing the adapter.
Cloudflare Workers (Recommended)
Templix is pre-configured with the @astrojs/cloudflare adapter and the Wrangler CLI. Static assets are served from Cloudflare’s edge network, and the voting API runs on demand in the Worker.
Note: As of
@astrojs/cloudflarev13, Cloudflare Pages is no longer supported — use Workers.wrangler.jsoncin the project root is already set up for this, including themainentrypoint,nodejs_compatand the staticassetsbinding.
Method 1: Deploy with Wrangler CLI
-
Install the Wrangler CLI (already included in dev dependencies):
npm install wrangler@latest --save-dev -
Build and preview locally:
npm run build && npx wrangler dev -
Deploy:
npm run build && npx wrangler deploy -
Your site will be live at a
workers.devsubdomain or your custom domain
Method 2: Deploy with Workers Builds (CI/CD)
- Push your code to GitHub
- Log in to the Cloudflare Dashboard
- Navigate to Compute → Workers & Pages and select Create application
- Under Import a repository, connect your GitHub account and select your Templix repository
- Configure the project:
- Build command:
npm run build - Deploy command:
npx wrangler deploy - Environment variables: Add
REPO_OWNERandREPO_NAME(if using GitHub mode)
- Build command:
- Click Save and Deploy
- Your site will automatically rebuild on every git push
Why Cloudflare Workers?
- Global CDN with edge network for fast delivery
- Free SSL certificates
- Preview URLs for every deploy
- Built-in observability and analytics
- Hybrid rendering support (static + on-demand)
- Generous free tier
Netlify
- Push your code to GitHub
- Connect your repository in Netlify
- Build command:
npm run build - Publish directory:
dist - Install and switch the adapter to
@astrojs/netlifyinastro.config.mjs - Deploy
Vercel
- Push your code to GitHub
- Import your repository in Vercel
- Vercel auto-detects Astro and configures build settings
- Install and switch the adapter to
@astrojs/vercelinastro.config.mjs - Deploy with one click
Other Options
- GitHub Pages
- AWS S3 + CloudFront
- Google Cloud Storage
- Any CDN or static hosting service
Note: For platforms other than Cloudflare you’ll need to install and switch the adapter in astro.config.mjs. Only @astrojs/cloudflare ships with Templix.
Environment Variables
Make sure to set environment variables in your hosting provider:
For Keystatic GitHub Mode:
REPO_OWNER- Your GitHub usernameREPO_NAME- Your repository name
For Cloudflare Workers:
- Build-time values (
REPO_OWNER,REPO_NAME, anyPUBLIC_*) go in the build environment — they are inlined into the bundle, so a secret set after the build is too late - Runtime values go in the dashboard under Settings → Variables and Secrets, or with
npx wrangler secret put <KEY> - For local development,
astro devandastro buildread.env;.dev.varsonly supplies runtime values towrangler dev
For template ratings (voting):
VOTE_PROVIDER-d1on Cloudflare, orsupabaseon any other host. Leave it unset and the site shows the rating stored in each template’s frontmatter, while rating one reports that voting is not configured — nothing breaks.- For D1: run
npx wrangler d1 create templix-votes, applyexamples/votes/d1.sql, then uncomment thed1_databasesblock inwrangler.jsoncwith the id it printed. - For Supabase: run
examples/votes/supabase.sqlonce, then setSUPABASE_URLandSUPABASE_SECRET_KEY. Use a server secret key, never the public/anon key. - These are runtime values. Never give them a
PUBLIC_prefix.
For SEO and social previews:
PUBLIC_SITE_URL- the public origin of your site, e.g.https://your-site.example. Read at build time and used for canonical links, Open Graph and Twitter image URLs, the sitemap androbots.txt. Leave it unset and the build falls back tohttp://localhost:4321, which would publish localhost URLs in your social tags and sitemap.
For the newsletter signup form:
PUBLIC_WAITLIST_ENDPOINT- where the footer form posts. Leave it empty and the form stays in preview mode: it validates the address but sends nothing.- Hosted form, no backend required:
PUBLIC_WAITLIST_ENDPOINT=https://formspree.io/f/YOUR_FORM_ID - Your own route, after copying
examples/leads/astro-route.tstosrc/pages/api/leads.ts:PUBLIC_WAITLIST_ENDPOINT=/api/leads
- Hosted form, no backend required:
- Provider credentials for the optional route (
LEAD_PROVIDER,SUPABASE_*,GOOGLE_SHEETS_*,LEAD_ALLOWED_ORIGINS) are listed inexamples/leads/server.env.example. Never give them aPUBLIC_prefix - that would inline them into the browser bundle.
For Keystatic Cloud Mode:
GITHUB_CLIENT_ID(GitHub mode only)GITHUB_CLIENT_SECRET(GitHub mode only)
[Screenshot: Environment variables configuration in hosting provider dashboard]
Performance Optimization
Templix is built for performance out of the box:
Automatic Optimizations
- Static Generation: All pages pre-rendered at build time
- Image Optimization: Astro automatically optimizes images
- Minimal JavaScript: Only interactive components ship JS
- CSS Purging: Unused CSS automatically removed
- Asset Bundling: Efficient asset loading and caching
Best Practices
- Use WebP or AVIF images for better compression
- Optimize images before upload (recommended max: 1920px width)
- Use SVG for logos and icons when possible
- Lazy load images for content below the fold
- Minimize custom JavaScript to maintain performance
Troubleshooting
Common Issues
Port Already in Use
If port 4321 is already in use:
# Use a different port
npm run dev -- --port 3000
Keystatic Admin Not Loading
- Clear your browser cache
- Ensure you’re accessing
/keystatic(with the trailing path) - Check that the dev server is running
- Look for JavaScript console errors
Build Errors
If you encounter build errors:
-
Delete
node_modulesand reinstall:rm -rf node_modules npm install -
Clear Astro cache:
rm -rf .astro
npm run build
Content Not Updating
- Restart the development server
- Clear browser cache
- Check that files are saved properly
- Verify content collection schemas match
Getting Help
If you need assistance:
- Check the Astro Documentation
- Visit Keystatic Documentation
- Review DaisyUI Components
- Search GitHub Issues
Next Steps
Now that you understand how Templix works, here are some suggestions for next steps:
- Customize Your Branding: Update logos, colors, and site name in global settings
- Add Your First Template: Create a template listing with images and pricing
- Configure SEO: Update meta descriptions and titles for better search visibility
- Set Up Analytics: Integrate Google Analytics or your preferred analytics tool
- Deploy to Production: Choose a hosting provider and go live
Ready to get started? Head over to the admin panel and begin customizing your template marketplace!
